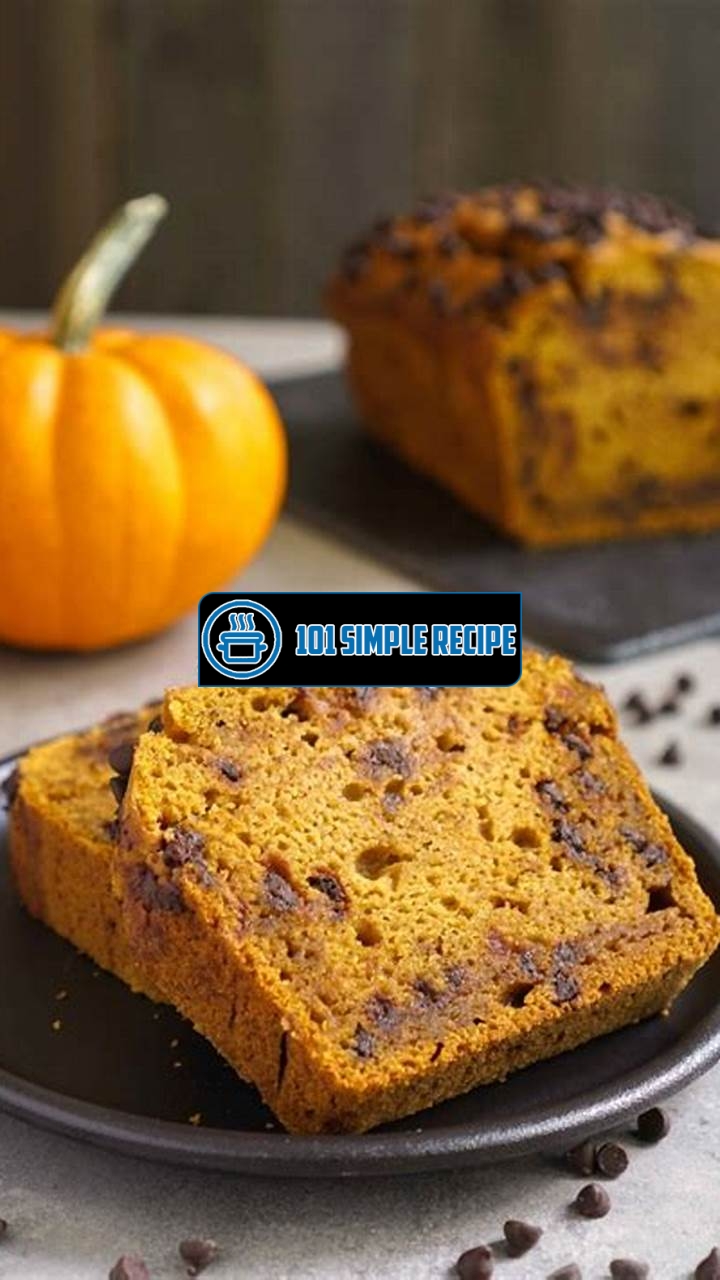
Are you in search of a delectable treat that will satisfy your sweet tooth and dietary restrictions? Look no further! Introducing the mouthwatering recipe for Delicious Gluten-Free Chocolate Chip Pumpkin Bread . This delightful combination of rich chocolate chips and flavorful pumpkin will leave you craving more. Whether you follow a gluten-free diet or simply want to try something new, this recipe is a must-try! With a soft and moist texture, every bite is pure bliss. So, grab your baking tools and get ready to indulge in the irresistible flavors of this Gluten-Free Chocolate Chip Pumpkin Bread recipe!

Understanding Gluten-Free Baking
Gluten-free baking is a unique approach to creating delicious treats that are free of the protein gluten, which is found in wheat, barley, and rye. For individuals with celiac disease, gluten sensitivity, or those who choose to follow a gluten-free diet, it’s important to understand the basics of gluten-free baking and how to adapt traditional recipes to meet their dietary needs.
Gluten is responsible for the elasticity and structure in baked goods. When gluten is removed from a recipe, it can be challenging to achieve the same texture and rise. However, with the right ingredients and techniques, you can still create mouthwatering gluten-free treats that rival their gluten-containing counterparts.
What is Gluten-Free Baking
Gluten-free baking involves using alternative flours and starches in place of traditional wheat flour. Common gluten-free flours include rice flour, almond flour, coconut flour, and tapioca flour. These flours provide their own unique flavors and textures, adding depth and complexity to baked goods.
In addition to alternative flours, gluten-free recipes often require a combination of binders and leaveners. Binders such as xanthan gum or guar gum help mimic the elasticity of gluten, while leaveners like baking powder or baking soda provide the necessary lift and structure.
Benefits of Gluten-Free Baking
Gluten-free baking offers a multitude of benefits, not only for those with gluten-related health issues but for anyone looking to explore new flavors and expand their culinary horizons. Some benefits of gluten-free baking include:
1. Variety: By removing gluten from your baking repertoire, you open the door to a wide range of alternative flours and ingredients, allowing for unique and diverse flavor combinations.
2. Healthier Options: Gluten-free baking often incorporates nutrient-rich ingredients such as almond flour, which is high in protein and healthy fats. This can result in baked goods that are not only delicious but also more nutritious.
3. Inclusivity: Offering gluten-free treats ensures that individuals with celiac disease or gluten intolerance can also enjoy the same indulgences as everyone else. It promotes inclusivity and caters to a wider audience.
Tips for Successful Gluten-Free Baking
Achieving successful gluten-free baking requires some expert tips and tricks. Here are some essential pointers to help you master the art of gluten-free baking:
1. Experiment with Flour Blends: Instead of relying solely on one type of gluten-free flour, try creating your own blends to achieve the desired texture and flavor. Mixing flours like almond, rice, and tapioca can lead to better results.
2. Measure Ingredients Accurately: Gluten-free baking is precise, so it’s crucial to measure ingredients accurately. Use measuring cups and spoons specifically designed for dry ingredients, and level off each measurement for consistency.
3. Don’t Overmix: Gluten-free batters can be more delicate than their gluten-containing counterparts. Avoid overmixing to prevent developing excess air and compromising the texture of your baked goods.
4. Use Xanthan Gum or Guar Gum: Adding these binders to your gluten-free recipes helps improve the texture and moisture retention of your baked goods. However, be sure to follow the recommended measurements, as too much gum can lead to a gummy texture.
By understanding the fundamentals of gluten-free baking and implementing these tips, you’ll be well on your way to creating delectable gluten-free treats that will satisfy any sweet tooth. Enjoy the journey of experimenting with alternative flours and ingredients, and embrace the world of gluten-free baking with confidence and creativity!
Recipe for Chantilly cake is a classic dessert that you can enjoy with the chocolate chip pumpkin bread.
Exploring the Flavors of Pumpkin
When it comes to baking, there is one ingredient that stands out for its versatility and ability to enhance the taste and texture of baked goods: pumpkin. Whether you’re making a classic pumpkin pie or experimenting with new recipes, pumpkin can add a unique and delightful flavor that is perfect for the fall season.
Pumpkin is not only delicious but also packed with nutrients. It is rich in vitamins A, C, and E, as well as fiber and potassium. These nutrients contribute to the overall health benefits of incorporating pumpkin into your diet.
One of the wonderful things about pumpkin is its ability to pair well with a wide range of flavors. Whether you prefer warm spices like cinnamon and nutmeg or more subtle flavors like vanilla or almond, pumpkin can complement them all. Its earthy and slightly sweet taste provides a perfect base for creating delicious baked goods.
The Nutritional Value of Pumpkin
Pumpkin is not only a flavorful ingredient but also a nutritious one. It is low in calories and high in essential nutrients, making it a great choice for those looking to maintain a healthy diet. Below are some of the key nutritional benefits of pumpkin:
- Vitamins: Pumpkin is an excellent source of vitamins A, C, and E. These vitamins play a crucial role in boosting the immune system, promoting healthy skin, and supporting overall cell function.
- Fiber: Pumpkin is a good source of dietary fiber, which aids in digestion and helps to keep you feeling full and satisfied after a meal.
- Potassium: Pumpkins are rich in potassium, a mineral that helps to regulate blood pressure and maintain proper heart function.
Adding pumpkin to your baked goods not only enhances the flavor but also boosts their nutritional value, providing you with a healthier alternative to traditional treats.
Pumpkin and Fall Flavors
Autumn is synonymous with warm and comforting flavors, and pumpkin is no exception. The combination of pumpkin and fall spices creates a delightful and nostalgic taste that is often associated with cozy gatherings and holiday celebrations.
Whether you’re making pumpkin bread, muffins, or cookies, the aroma of pumpkin spice filling your kitchen is sure to bring a sense of warmth and joy. The flavors of cinnamon, nutmeg, ginger, and cloves blend harmoniously with pumpkin, creating a comforting and fragrant experience.
Choosing the Right Pumpkin
When it comes to choosing the perfect pumpkin for your recipes, there are a few things to keep in mind. The type of pumpkin you select will depend on the specific recipe you plan to make.
If you’re looking to make puree for your baked goods, you’ll want to opt for a sugar pumpkin or pie pumpkin. These varieties have a sweeter and smoother flesh, perfect for making velvety pumpkin puree.
On the other hand, if you’re planning to carve a pumpkin for Halloween and also want to use the flesh for baking, a medium-sized carving pumpkin will work just fine. While the texture may be slightly grainier, it will still add that distinct pumpkin flavor to your recipes.
Remember to look for pumpkins that are firm, with no soft spots or mold. The skin should be free of blemishes and have a bright orange color. If you’re unsure about the type of pumpkin to use, don’t hesitate to ask your local farmer or grocer for recommendations.
As you can see, pumpkin is not just a seasonal decoration but also a flavorful and nutritious ingredient that can elevate your baked goods to a whole new level. Whether you’re enjoying a slice of pumpkin bread or indulging in a warm pumpkin spice latte, the flavors of pumpkin will always bring a smile to your face. So, go ahead and embrace the versatility of this fall favorite and start exploring the world of delicious pumpkin recipes today!
Chocolate-Infused Delights
Indulge in the delectable combination of chocolate and pumpkin flavors when it comes to baked treats. This irresistible pairing brings together the rich, velvety taste of chocolate with the warm, earthy notes of pumpkin. Whether it’s a chocolate chip pumpkin bread or a pumpkin brownie with a chocolate ganache, these treats are sure to satisfy your sweet tooth and leave you craving for more.
The Science Behind Chocolate and Pumpkin Pairing
While it may seem like an unconventional combination, there is actually some science behind the pairing of chocolate and pumpkin. Both ingredients contain compounds that enhance each other’s flavors when combined. Chocolate is known for its complex flavor profile, which includes bitterness, sweetness, and hints of earthiness. Pumpkin, on the other hand, offers a smooth and slightly sweet taste that complements the richness of chocolate.
When chocolate and pumpkin are combined, the flavors mingle and create a harmonious taste sensation in your mouth. The bitterness of the chocolate is balanced by the sweetness of the pumpkin, creating a well-rounded and satisfying flavor profile. Additionally, the natural sweetness of pumpkin can help to enhance the overall sweetness of the chocolate, making it even more enjoyable.
Health Benefits of Chocolate
Contrary to popular belief, chocolate can actually offer some health benefits when consumed in moderation. Dark chocolate, in particular, is rich in antioxidants that can help protect your body from free radicals and reduce inflammation. These antioxidants, known as flavonoids, have been linked to a lower risk of heart disease and improved brain function.
Furthermore, dark chocolate contains minerals such as iron, magnesium, and zinc, which are essential for various bodily functions. It may also help improve mood and reduce stress levels due to the presence of certain compounds that stimulate the production of endorphins, the “feel-good” chemicals in your brain.
However, it’s important to note that not all chocolate is created equal. Milk chocolate and white chocolate have higher sugar and fat content, which can negate some of the potential health benefits. Therefore, it’s advisable to opt for dark chocolate with a minimum cocoa content of 70% to reap the most nutritional advantages.
Choosing the Right Type of Chocolate
When it comes to choosing chocolate for your chocolate chip pumpkin bread or other baked goods, it’s essential to select the right type. As mentioned earlier, dark chocolate with a high percentage of cocoa is the healthiest option. Look for bars or chips that have at least 70% or more cocoa content.
If you prefer a sweeter flavor, you can opt for semisweet chocolate chips, which have a slightly lower cocoa content but still offer a rich taste. These can be a great addition to your pumpkin bread, providing bursts of chocolatey goodness in every bite.
For those who enjoy a more intense chocolate flavor, consider using unsweetened baking chocolate. This type of chocolate has no added sugar and is perfect for recipes where you want to control the sweetness and intensity of the chocolate taste. Just keep in mind that using unsweetened baking chocolate may require adjusting the amount of sugar in your recipe.
Overall, the combination of chocolate and pumpkin in baked treats is a delightful union of flavors that is sure to please any chocolate lover. Experiment with different recipes and chocolate types to find your perfect balance of sweetness and richness. So go ahead and indulge in the deliciousness of chocolate chip pumpkin bread or any other chocolate-infused pumpkin treat – your taste buds will thank you!
Mastering the Art of Breadmaking
Are you ready to embark on a delicious baking adventure? Whether you’re a seasoned baker or just starting out, breadmaking is an art that can be mastered with the right techniques and tips. In this guide, we will take you through the essential steps to create the perfect loaf of bread every time.
The Role of Yeast in Breadmaking
Yeast: The magical ingredient that transforms a simple dough into a fluffy and flavorful loaf of bread. Yeast is a living organism that feeds on sugar and releases carbon dioxide, which causes the dough to rise. It is crucial to activate the yeast properly to ensure a successful breadmaking process.
Activating the yeast: Before adding the yeast to your dough, make sure it is alive and active. Dissolve the yeast in warm water (around 100°F) and add a pinch of sugar. Let it sit for about 5 minutes until it becomes foamy. This foaming reaction indicates that the yeast is alive and ready to work its magic in your dough.
Kneading the dough: Kneading is an essential step in breadmaking as it develops gluten, which gives the bread its structure and elasticity. Gluten forms when water combines with proteins present in wheat flour. Knead the dough vigorously for at least 10 minutes until it becomes smooth and elastic.
The power of patience: After kneading, it’s time to let the dough rest and rise. Place the dough in a greased bowl, cover it with a clean cloth, and let it rise in a warm spot for about an hour or until it doubles in size. This waiting period allows the yeast to continue feeding on sugar and releasing more carbon dioxide, resulting in a beautifully risen loaf.
Working with Gluten-Free Flour
Gluten-free: The term that has become increasingly popular in the baking world, especially for those with gluten sensitivities or celiac disease. Gluten is a protein found in wheat, barley, and rye, which gives bread its characteristic texture. However, creating a gluten-free loaf of bread requires a different approach.
Choosing the right flour: When working with gluten-free flour, it’s essential to select a blend specifically designed for breadmaking. These blends often consist of alternative grains and proteins that mimic the texture and structure provided by gluten. Experiment with different brands to find the one that works best for you.
Adding binders: Since gluten-free dough lacks the elasticity provided by gluten, it’s important to add binders such as xanthan gum or psyllium husk powder. These ingredients help to hold the dough together and prevent it from crumbling. Follow the recommended measurements provided by your flour blend or recipe.
Adjusting the liquid-to-flour ratio: Gluten-free dough tends to be stickier and wetter than traditional dough. To achieve the right consistency, adjust the liquid-to-flour ratio accordingly. Add more liquid (such as water or milk) in small increments until the dough comes together without being overly dry or too sticky.
Secrets to Achieving a Fluffy Texture
Temperature matters: ️ When it comes to achieving a fluffy texture, temperature plays a crucial role. Make sure to use lukewarm liquids (around 110°F) in your dough, as this encourages yeast activation and fermentation. Additionally, allow your dough to rise in a warm environment (around 80°F) to promote optimal yeast activity and dough expansion.
Precise measurements: Baking, including breadmaking, is a science that requires precise measurements. Use a digital scale to weigh your ingredients accurately, rather than relying solely on volume measurements. This ensures consistent results and helps you avoid dense or undercooked bread.
Steamy oven trick: To achieve a crispy crust and a soft interior, create a steamy environment in your oven during the initial stages of baking. Place a pan filled with hot water on the bottom rack while preheating the oven. This steam helps to keep the bread moist and enhances crust development.
Proper cooling: Once your bread is baked to golden perfection, resist the temptation to slice into it immediately. Allow the loaf to cool on a wire rack for at least 30 minutes to ensure that the interior finishes cooking and the flavors have time to develop.
With these essential techniques and tips, you’re well on your way to becoming a breadmaking pro. So roll up your sleeves, gather your ingredients, and let the aroma of freshly baked gluten-free bread fill your kitchen.
Cookie in a mug recipe is a quick and easy dessert recipe.
Making a Gluten-Free Chocolate Chip Pumpkin Bread
Are you ready to embark on a culinary adventure and create a mouthwatering gluten-free chocolate chip pumpkin bread? Look no further! In this step-by-step guide, we will take you through the process of making this delectable treat that will leave you craving for more. So let’s roll up our sleeves and get started!
Key Ingredients for Gluten-Free Chocolate Chip Pumpkin Bread
Before we dive into the recipe, let’s gather all the essential ingredients. Here’s what you’ll need:
- A cup of gluten-free all-purpose flour
- ½ teaspoon of baking powder
- ½ teaspoon of baking soda
- ½ teaspoon of salt
- 1 teaspoon of ground cinnamon
- ½ teaspoon of ground nutmeg
- A pinch of ground cloves
- ½ cup of granulated sugar
- ½ cup of brown sugar
- ½ cup of unsalted butter, softened
- 2 large eggs
- 1 cup of canned pumpkin puree
- 1 teaspoon of vanilla extract
- 1 cup of chocolate chips
Note: Make sure to use gluten-free all-purpose flour to ensure the bread is safe for those who follow a gluten-free diet.
Step-by-Step Instructions for Gluten-Free Chocolate Chip Pumpkin Bread
Now that we have all our ingredients ready, let’s move on to the step-by-step instructions:
- Preheat your oven to 350°F (175°C) and grease a loaf pan with cooking spray or butter.
- In a mixing bowl, whisk together the gluten-free all-purpose flour, baking powder, baking soda, salt, cinnamon, nutmeg, and cloves.
- In a separate bowl, cream together the granulated sugar, brown sugar, and softened butter until light and fluffy.
- Add the eggs one at a time, beating well after each addition. Then, stir in the pumpkin puree and vanilla extract.
- Sift in the dry ingredients gradually, stirring gently after each addition until just combined. Be careful not to overmix.
- Gently fold in the chocolate chips, ensuring they are evenly distributed throughout the batter.
- Pour the batter into the prepared loaf pan and smooth the top with a spatula.
- Bake for 50-60 minutes or until a toothpick inserted into the center comes out clean.
- Once baked, remove the bread from the oven and let it cool in the pan for around 10 minutes. Then, transfer it to a wire rack to cool completely before slicing.
Note: It’s important not to overmix the batter as it can result in a dense and tough texture. Gently folding in the dry ingredients and chocolate chips will give you a moist and tender bread.
Adding Variations and Personal Touches to Your Bread Recipe
Now that you’ve mastered the basic gluten-free chocolate chip pumpkin bread recipe, it’s time to get creative and add your own personal touches. Here are some variations you can try:
- Swap the chocolate chips for chopped walnuts or pecans to add a crunchy texture.
- Sprinkle a cinnamon-sugar mixture on top of the batter before baking to create a sweet crust.
- Add a teaspoon of pumpkin spice for an extra burst of fall flavors.
- Drizzle a cream cheese glaze over the cooled bread for a decadent finishing touch.
Feel free to experiment and customize the recipe to suit your taste preferences. Don’t be afraid to add your own unique flair to this already delightful treat!
Garlic bread stick recipe is another delicious bread recipe that you can try.
Frequently Asked Questions
You may have some questions regarding this chocolate chip pumpkin bread recipe. Here are a few frequently asked questions to help you out:
| No. | Questions | Answers |
|---|---|---|
| 1. | Can I make this recipe gluten-free? | Yes, you can! This chocolate chip pumpkin bread recipe is gluten-free, perfect for those with dietary restrictions or preferences. |
| 2. | How can I replace the pumpkin puree? | If you don’t have pumpkin puree on hand, you can substitute it with mashed sweet potato or butternut squash for a similar texture and flavor. |
| 3. | Can I freeze the bread? | Absolutely! This chocolate chip pumpkin bread freezes well. Just make sure to wrap it tightly in plastic wrap or place it in an airtight container before freezing. Thaw it overnight in the refrigerator before enjoying. |
| 4. | What can I substitute for chocolate chips? | If you’re not a fan of chocolate chips, you can swap them out for raisins, chopped nuts, or even dried cranberries for a different twist of flavor. |
| 5. | Can I add additional spices? | Of course! Feel free to experiment with additional spices like cinnamon, nutmeg, or ginger to enhance the flavor profile of this delicious pumpkin bread. |
| 6. | How long does the bread stay fresh? | The chocolate chip pumpkin bread can be stored at room temperature for up to 3 days, or in the refrigerator for up to one week. Just make sure to wrap it tightly to maintain its freshness. |
Thanks for Reading and Visit Again!
We hope you enjoy making and savoring this gluten-free chocolate chip pumpkin bread recipe. It’s a delightful treat that brings together the warmth of pumpkin with the richness of chocolate chips. Remember to visit our website again for more delicious recipes and culinary inspiration. Happy baking!
Jump to Recipe
Gluten-Free Chocolate Chip Pumpkin Bread

Indulge in a moist and flavorful gluten-free chocolate chip pumpkin bread. This recipe combines the perfect blend of pumpkin, warm spices, and sweet chocolate chips to create a delightful treat for the whole family.
- 2 cups gluten-free flour
- 1 teaspoon baking soda
- 1/2 teaspoon salt
- 1 teaspoon cinnamon
- 1/2 teaspoon nutmeg
- 1/4 teaspoon cloves
- 1/2 cup unsalted butter (melted)
- 1 cup pumpkin puree
- 1 cup granulated sugar
- 1/2 cup brown sugar
- 2 eggs
- 1 teaspoon vanilla extract
- 1 cup chocolate chips
- Preheat the oven to 350°F (175°C). Grease a 9×5-inch loaf pan and set aside.
- In a large bowl, whisk together the gluten-free flour, baking soda, salt, cinnamon, nutmeg, and cloves.
- In a separate bowl, whisk together the melted butter, pumpkin puree, granulated sugar, brown sugar, eggs, and vanilla extract until well combined.
- Pour the wet ingredients into the bowl with the dry ingredients. Stir until just combined.
- Fold in the chocolate chips until evenly distributed throughout the batter.
- Pour the batter into the greased loaf pan. Smooth the top with a spatula. Bake for 50-60 minutes, or until a toothpick inserted into the center comes out clean.
- Remove the bread from the oven and let it cool in the pan for 10 minutes. Transfer the bread to a wire rack to cool completely before slicing and serving.


